We know Minecraft plugin tutorials can seem overwhelming. That’s why we created this easy to understand Minecraft plugin tutorial. Following each step will help you learn how to make your own plugin. If that’s too many steps you can always jump to the end of the article and download the project files from Github!
Step 1: Setting up the environment
The first step in creating a Minecraft plugin is setting up your development environment. To do this, you’ll need to download and install the following:
- Java Development Kit (JDK): https://www.oracle.com/java/technologies/javase-downloads.html
- IntelliJ IDEA Community Edition: https://www.jetbrains.com/idea/download
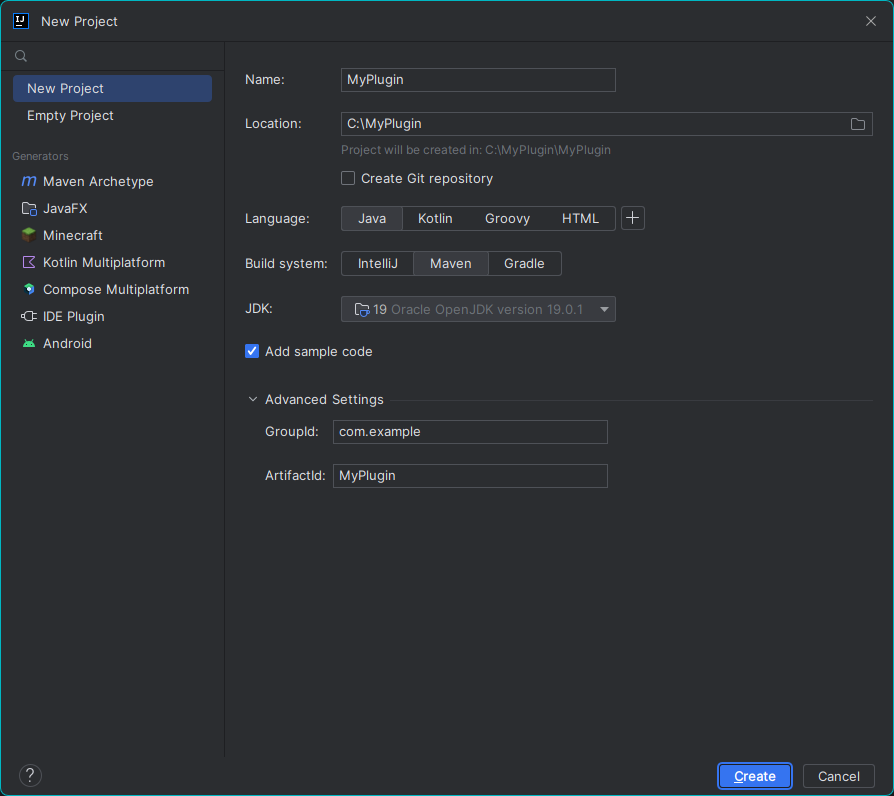
Once you have installed these tools, open IntelliJ IDEA and select “Create New Project”. After that, choose “Maven” as the project type. In the section labeled group ID you typically put a a reversed domain name here. For example if you own example.com you would put com.example as the groupId. Next, in the section for artifactId you’ll want to enter “MyPlugin” as the name of your first plugin (you can also name it anything you want).
Step 2: Adding the Spigot dependency and repository
Next, we need to add the Spigot dependency and repository to our project. This will open up the Spigot API to create your first Minecraft plugin. Locate and open the pom.xml file in your project and add the following lines of code before </project>
<repositories>
    <repository>
        <id>spigot-repo</id>
        <url>https://hub.spigotmc.org/nexus/content/repositories/snapshots/</url>
    </repository>
</repositories>

<dependencies>
    <dependency>
        <groupId>org.spigotmc</groupId>
        <artifactId>spigot-api</artifactId>
        <version>1.19.3-R0.1-SNAPSHOT</version>
        <scope>provided</scope>
    </dependency>
</dependencies>
Once this is added to your pom.xml file you’ll want to click on the Maven button (located on the right of the IDE). Follow the arrows by Archetype > MyPlugin > Lifecycle and double click install. This will add the Spigot dependency to the project so you can use it.
Step 3: Adding your Minecraft plugin information
Next we need to add a plugin.yml file to your resources folder. This tells Spigot information about your plugin like the version number and the commands your project will use. For now we’re only going to add in the basic information. In IntelliJ head over to “src/main/resources/” folder and right click on the folder. Choose New > File and name it plugin.yml.
name: MyPlugin
version: 1.0
main: com.example.Main
Step 4: Adding your first code
Now it is time in this Minecraft plugin tutorial to finally create your own code! First we need to edit the main class for our plugin. In IntelliJ open “src/main/java/org.example” folder and click on “Main”. Replace the code in that file with the code below:
package com.example;

import org.bukkit.plugin.java.JavaPlugin;

public class Main extends JavaPlugin {

    @Override
    public void onEnable() {
        getLogger().info("MyPlugin has been enabled!");
    }

    @Override
    public void onDisable() {
        getLogger().info("MyPlugin has been disabled!");
    }

}
This code extends the JavaPlugin class from the Spigot API and overrides the onEnable() and onDisable() methods. This is what allows you to add your own code to these events.
Step 5: Testing the plugin
Now that your plugin is all set up we need to test by packaging this plugin as a JAR file. Go back to the Maven logo on the right side of IntelliJ. This time, instead of choosing install, you need to choose package. This creates a JAR file that Spigot can then understand.
Once your plugin has finished compiling copy the Minecraft plugin JAR file from the “target” folder to the “plugins” folder in your Minecraft server. After it has copied, start up the server (or restart it, if it’s online) and you should see the message “MyPlugin has been enabled!” in the console.
To further test that the plugin is working correctly, join the server and you should see a message in the console welcoming you to the server.

Congratulations, you have created your first Minecraft plugin!
While this Minecraft plugin tutorial only scratches the surface of what is possible with Minecraft plugins, it should give you a good starting point for further exploration. With a little more experience, you can create plugins that add new gameplay mechanics, custom items, and much more.
Creating a Minecraft plugin can be a fun and rewarding experience but learning about Minecraft plugin development can be challenging. There are seemingly endless amounts of tutorials, videos, and information out there with conflicting information.
In summary, you should now have all the tools you need to start your journey in creating an amazing plugins that can enhance the Minecraft experience for yourself and others. If you would like to download a copy of the code used in this article you can tap here. Now that you’ve learned how to create a Minecraft plugin, what will you create next?